Looking to start a landscape lighting project but not sure where to begin? Don’t worry, you aren’t alone. With all the different types of outdoor lighting available, it can be hard to decide what kind of lights to put where, or even how many you need. Picking a porch light is one thing, but designing a whole back yard is something else entirely. Especially if you’ve opted out of hiring a professional designer and electrician to do the work for you and go the DIY landscape lighting route, the blank slate of a new project can be pretty intimidating. But whether you’re looking to illuminate your whole house or just a few key features in your yard, there are a few basic lighting techniques that should shed some light on your plans and help you get you off the ground.
Uplighting
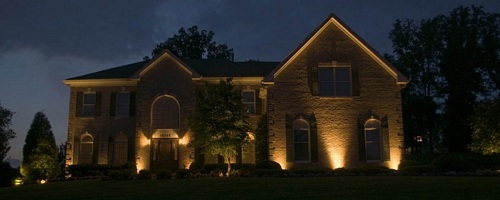
Uplighting is basically exactly what it sounds like: you place your lights low and point them…up. This creates a beautiful effect both against a building and in the garden. The home in the picture above uses lots and lots of uplighting; the bright light at the base of the house and garden fades vertically, creating a soft, warm, glow effect that makes it look warm and inviting. For a two story house, you want a powerful Floodlight bright enough to at least partially reach the second story, and wide enough for the light to spread out near the roof.
Smaller Spotlights also work for exterior walls, but create a much different effect, especially if you space them a little farther apart. Instead of creating a glow that envelopes your home, smaller lights create a more dramatic contrast, bringing aspects of your architecture into the fore while deepening and intensifying the shadows. This looks great both from afar and up close; curb side, the light and dark is striking, and makes your home extremely visible, and from your walkway it emphasizes the texture of your home and can partially illuminate flower beds and walkways for a warmer feel up close.
Spotlighting
In daylight, you can see your whole garden, but at night you have the freedom to pick and choose how much or little you want to highlight, and spotlighting is a great way to draw attention to your favorite outdoor features. A subset of uplighting (or downlighting – though it can be harder to find a place to mount the light up high), spotlighting is, again, more or less what it sounds like: choosing a specific, usually smaller spot, and shining a light on it. This kind of lighting is great for distinctive features in your back yard. If you have trees, tall plants or flowers, or even a nice bird bath, statue, or fountain, highlighting it with a single bright light can pull an interestingly shaped or colored feature out of the darkness and make it a bold central feature of your landscape. While for a larger object like a fountain you might want a traditional angled spotlight, Well Lights work great for trees, casting a beam of light straight up into the branches and lighting the leaves from underneath – the angle makes a difference!
For example, angled spotlights can do a fantastic double duty of creating shadows. If your interesting-shaped object, be it vegetable or mineral, is located anywhere near a wall, a small, bright Accent Light or two can replicate the shape, in shadow, on the wall, like the cherub statue above. This works equally well for plants – trees look great in any season, casting shifting patterns of light and shadow when they’re in full leaf, and long creepy spindly stick shadows in late fall and winter.
Grazing
Grazing, another form of uplighting, is like very close-up spotlighting. Rather than highlighting the whole side of a house or an entire plant, grazing aims to feature a small patch of texture rather than the big picture. Like the entryway above – the grazing lights neither light the entry itself nor make the house itself especially pronounced. Instead, the lights primarily feature the uneven brick texture of the two columns. Small Spotlights placed at the base of the columns light the bottoms of each brick and cast small shadows where they protrude, adding depth to what might, during the daytime, be a fairly even looking surface.
The same goes for plants – especially trees. Bark, like those brick columns, is naturally uneven, and when lit from below it will cast deep shadows on itself. Palm trees work especially well with this type of lighting, as their rough, tiered bark casts even more dramatic and deep shadows than your standard pine, but this technique works for basically any tree with a textured bark. For an especially dramatic look, you can actually mount a Small Accent Light directly onto the trunk of the tree, to highlight a specific portion of the bark or branches.
Silhouetting
Silhouette lighting is something else entirely. While technically a form of uplighting, it functionally bears very little resemblance to other types of lighting in this category. Rather than highlighting a space, shape, or texture by shining light on it, silhouetting does exactly the opposite and shines a light on the wall directly behind an object like this spiral topiary. The effect is what it sounds like – the object itself is blacked out and reduced to a dark silhouette that stands out dramatically against a lit background. A Lower Voltage Light is probably preferable for this purpose, as a very bright light might spill over and light parts of what you’re trying to black out, ruining the effect.
Downlighting
Downlighting is the exact opposite (as you might have guessed) of uplighting. Rather than highlighting a specific area, and letting the light dissipate upwards, downlighting uses the advantage of height to light a wide area beneath it – like ceiling lights indoors. Only outside, as with the gazebo above, you’re not only lighting the area below, but you want to make sure the light shows outside as well, to highlight the building and make it look warm and inviting from afar. That means that, in addition to your typical Overhead Lighting, you’re probably going to want some top or wall-mounting Floodlights as well. As you can see in the image above, though, outside the gazebo there’s a different type of downlighting as well: several Tall Downward Facing Path Lights scattered around the landscape and walkways. These cast light downward on the ground to gently highlight the surrounding area.
On a smaller scale, downlighting falls into several other categories including Step Lights, Path Lights, and even some sconce-style Deck Lights. Basically, downlighting in this sense uses a smaller height to cast a pool of light on a smaller area, whether it be a part of the landscape or a walkway or other well-trafficked area. More than any other form of lighting, low-lying downlighting is super important for safety if you or your guests spend any amount of time walking around in your back yard at night. While uplighting and its various forms are primarily about making your back yard look good, downlighting, in all its forms, is more about making that same space more livable – both well lit for spending time in as well as making it safe to walk in.
Whatever kind of lighting you end up choosing, perhaps one of the most important things to remember is that, unless the light fixture itself is prominently displayed, you shouldn’t worry too much about what it looks like. Instead, focus on the shape and power of the light, to make sure that it will highlight exactly what you want it to in the way you want it to. There’s a world of difference between a huge floodlight and a spotlight, or even different shaped or height path lights, so once you have an idea of what techniques you want to use where, make sure you pick the right light for the job. Are you looking to do a big landscape lighting job, or a smaller one? What’s your favorite lighting technique? Has reading this post made you think of something in your own garden you’d like to see lit up? Let me know in the comments!